Some years ago, we sold our live-aboard cruising yacht Elizabeth when we decided that we weren’t brave enough to continue with our world cruising plans in the company of a small baby. In the intervening years, we have often looked in a dreamy way at the yacht listings, but it was never either practical or the right time. Finally, however, the stars aligned in our favour: We found ourselves living by the coast on the island of Tasmania, next to arguably the best cruising ground in Australia, and our daughter turned six and began to show an interest in the world of sailing.
We were monitoring the sales listings for live-aboard cruising yachts around the Southern hemisphere, and looking for something a lot cheaper and older than either of our previous standard production boats Pindimara or Elizabeth. We reckoned that we were now experienced enough to tackle something a little more bespoke and unusual, and there were plenty of interesting candidates out there, many of which had been circumnavigating with families aboard for years.
We had been talking to agents in the US and New Zealand, and although there were plenty of boats for sale, we were prevented from travelling to either destination by the ongoing COVID-19 pandemic. Then a couple of interesting yachts popped up right in our own neighbourhood, and we went to have a look. On the walk back from the marina berth of a particularly interesting steel-hulled Adams 35, we passed a lovely little blue pocket cruiser with a hand-written ‘for sale’ sign tied to the shrouds.
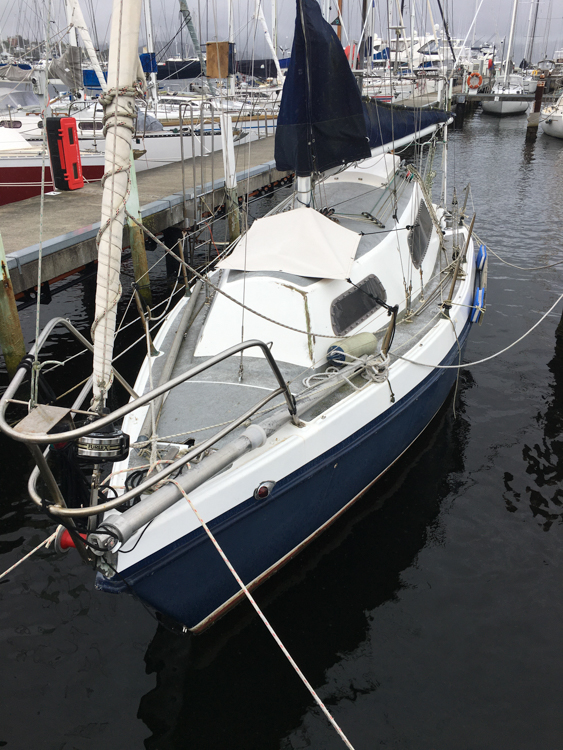
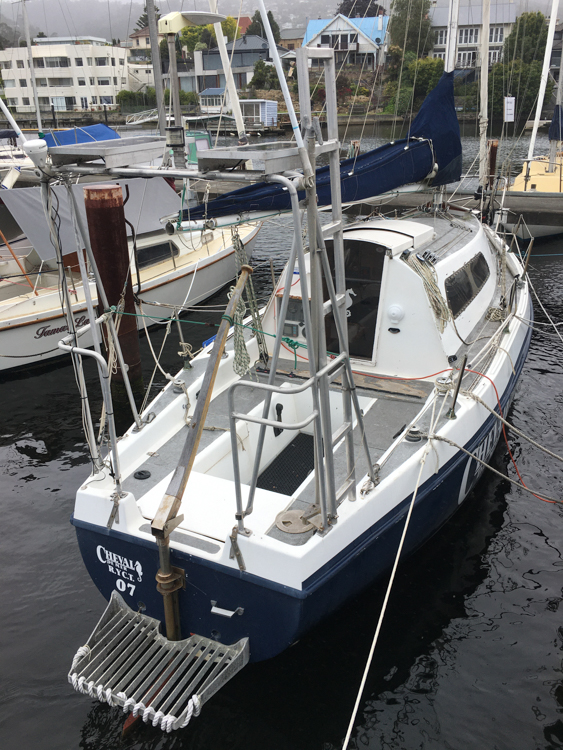
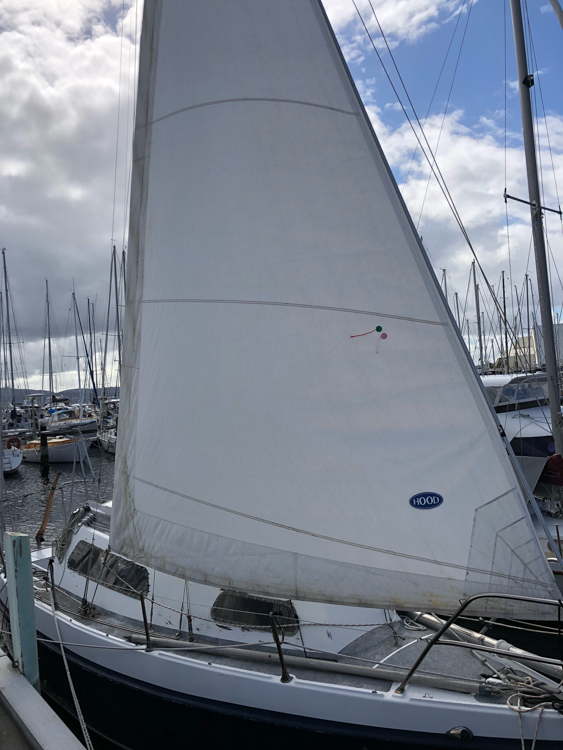
The owner, Tom, was aboard, and showed us around. She was a sound 26-footer that had been used for several decades as a live-aboard at the marina, but all her rigging was in place and she had a newish engine and, we were told, a full sail inventory. Tom had been stuck in the US for the last two years due to work and the pandemic, and so the little boat had sat wallowing unattended for all that time and now sported flaking paint on the coach house and significant rain-water in the bilges. Nevertheless, she appeared to be fundamentally sound, had a recent insurance survey, and was very very cheap as the owner had moved ashore and didn’t need her as a home any more.
As a coastal pocket cruiser, she wasn’t at all the kind of boat that we’d been looking for, but she felt good aboard and the price was very appealing. We slept on the idea, and then realised that this might be exactly the kind of yacht that we needed. Because our 6-year old daughter had just started school, we were unlikely to need an ocean-capable cruising yacht in the near future, and knew from experience that such vessels can be horribly expensive to keep in trim if only sailed at the weekend rather than cruising aboard. We have regular jobs and a couple of building projects on the go, and wouldn’t be sailing on a daily basis. Furthermore, at only 26 feet and steered with a tiller, she might be just the boat to teach an enthusiastic little girl how to sail.
We had thought that whatever boat we finally purchased, we would keep her on our own mooring near to our bush property to the south of the island. However, Tom had already established that the marina would be happy for us to take over the lease on the existing berth, which was only minutes from our newly built house.
We handed over the cash, and are now proud owners of an elderly but cute Snook 26, named Cheval de Mer.
We have just purchased a pocket cruiser, registered as a 1978 Snook 26. Since there is no record of Michael Snook ever designing a 26-foot version of his famous racing boat, we were curious about her history. Luckily for us, a previous owner had left on board a potted history of the yacht.
She was originally launched as a standard Snook 22 racing yacht, purchased by a Steve Lovell, whose nickname was ‘Shovel’. He raced her as ‘Shovel’ out of Bellerive in southern Tasmania.
A year later, he hauled her out and cut her in half with a chainsaw. Aided and abetted by Michael Snook himself, he spent three weeks inserting a four-foot pre-prepared centre section, increasing the total length to 26 feet (a change from 6.7 to 8 metres). To balance the boat, they moved the keel aft, and increased the draft from 1.3 to 1.7 metres. Arguably just for fun, they also increased the height of the mast to a 9 metre luff, and extended the boom out to 3 metres.
In this new format, Shovel raced very successfully, and – by virtue of the extended cockpit (which was known locally as ‘the beer garden’) – became a popular venue for post-race drinks and, by all accounts, some pretty disreputable parties.
At some point in the nineteen-eighties, Steve sold Shovel and moved to the mainland. The next known report is from a subsequent owner, Dennis, who found her in a dilapidated state in Devonport in Northern Tasmania. Dennis helped the then owners to rebalance the boat – now known as ‘Kermit’ – as a cruiser, and later bought her from them and sailed her back to Hobart. He reported that, even detuned, she was still very fast, with a propensity for surfing on the swell that had to be continually damped by means of trailing drogues.
Now berthed at the marina, Dennis and Fiona fitted her out as a live-aboard cruising boat. To increase the living space, they lifted the coach roof to give 6 feet of headroom while extending the cabin back into the ‘beer garden’ to return it to a more reasonably sized cockpit. They added a larger rudder, a pushpit, an inboard Yanmar engine, and had the interior fitted out with bunks, drawers, sinks, table, chairs and a head.
Looking aftLooking forward
They wanted to rename her, too, and were keen to retain some reference to the Snook’s long and interesting history. After some thought, ‘Shovel’ became ‘Cheval’, and then by obvious inference, ‘Cheval de Mer’.
Dennis and Fiona lived aboard for some 13 years, and I infer from the charts that I found in a stern locker, that they travelled to the mainland and then up the NSW coast at least as far as Port Stephens.
In around 2004 she was back in Hobart, and was acquired by Tom as a permanent live-aboard. He didn’t sail her much, but made some changes more in keeping with her new function as a stationary home. About five years later, Tom’s work took him to the US, where he remained for two years. Cheval de Mer slowly aged in the marina, starboard side facing into the weather, where the paint abraded away from the coach house and she began to leak.
Mould under the mattress in the fore-peakRain water in the fore-peak bilges
On his return, Tom found himself in changed circumstances and living on land, and he just wanted to pass the yacht on to somebody who would appreciate her. And that is where we came in.
Despite spending nearly a decade largely stationary, her hull seemed sound, the moving parts were all still moving, and the only issues seemed to be with the ply of the cabin top. In the middle of a pandemic and with the marina’s hard-standing already full of racing yachts getting tuned for the season, taking her out of the water for an inspection was a non-starter, so we took a deep breath and bought her warts and all without either a test sail or a professional survey.
As soon as we took possession, we emptied her out, and took her out on the water. She performed beautifully in the gusty light winds of the day, with a slight tendency to lee helm as she appeared to be massively over-powered. Considering her history, that’s not at all surprising, and we’re happy that we just need to settle in and get comfortable with her.
Our new boat leaked when it rained. It wasn’t subtle; water poured in around the badly sealed acrylic windows, and through the screw holes, and through the wooden framing.
Not only is it raining inside, but you can see the mould along the wall beneath.
Given the sheer volume of rain water that we were pumping out of the bilges on every visit, it was clear that this was Item 1 on the agenda.
For the last decade, Cheval de Mer had been sitting in her berth, with the starboard side facing into the prevailing weather. The port side wasn’t too bad, but to starboard the paint had flaked off, and parts of the forty-year-old marine-ply superstructure had degraded to such an extent that they were water-permeable.
Rain damage on the starboard fore-quarterDefinitely in need of some love and attention
My first task was to undo the dozens and dozens of dome-nuts that held the windows on. This was tricky without an assistant, and I didn’t have a mole-grip to hand. I rigged up a spanner hanging from a line on the outside, which provided just enough resistance to undo the screw from the inside. Then return outside to reset the spanner, then back inside. Repeat… it took a while.
The old acrylic windows to starboard then popped out easily in a flurry of weathered wood-flakes.
The starboard window frame revealed
The port-side windows were fixed with sterner stuff. They had been glued in with a strong sealant, and the only way to get them out was to shatter them with a blunt implement. Eventually I extracted all the shards from the frame, only to find that the sealant itself was still firmly bonded to the paint all down the port side, completely immune to scraping. I got it off by applying a heat-gun, which didn’t affect the sealant but which bubbled up the paint underneath so that I could get the whole mess off with a scraper.
The port side is not so damaged, but has its own problems
Even though the wood was sodden in places, once covered in a tarpaulin it dried out without warping, although there were significant cracks and dints. Woodwork is not my favourite activity, so I cast around for an easier way to repair the damage. It was then that I discovered the delights of the amazing West System 105 epoxy resin.
This stuff is incredible. You mix it up and slather it onto wood (or fibreglass), and it soaks its way inside the layers, chasing away any water, and then sets to a hard but slightly flexible finish. I spent several days happily painting it onto the exposed wood, and watching it vanish completely inside, before finally it had seeped in everywhere it wanted to go and the final coat stayed on the surface, looking like a thick varnish.
Starboard: West System 105Port: Heat-gun and Knead-It
You know how this goes. Sand, fill, sand, fill, sand, fill…
Once I’d done the major work with West System 105, I filled small imperfections with Knead-It, a two-part filler that comes in a handy tube which means that you can just tear off exactly the amount that you need. Eventually there were so many different colours and textures that I couldn’t work out by eye what was flat and what wasn’t, so it was time to add some paint.
I used Norglass Shipshape two-pack primer, which sticks to pretty much everything that my boat is made of. On my first go, I made the mistake of brushing it straight after mixing, when it was still runny and very hard to work with, but I learned to patiently wait the crucial first ten minutes for it to go off. It went on pretty well after that.
Once it was all the same colour, my eye was no longer distracted by all the different textures, and I could properly see the lumps and bumps that needed sanding and filling.
That starboard fore-quarter again, looking very colourful, but nearly done
A second coat of primer, a final sand and minor filling, and then a top-coat of two-pack Norglass Norcote. For a short while, at least one part of the boat looked like a million dollars.
Shiny!
I waited a couple of hours for it to dry, but the weather was against me. The temperature was hovering around ten degrees, which is the minimum for curing, and the surface stayed resolutely tacky. Rain was forecast and I had to pick up my daughter from school, so I covered the boat in a tarp.
That night, the wind blew the tarp in so that it stuck to the paint, and I had to peel the whole thing off. Then I had to sand off most of my hard-won polished finish, and deal with some slumping that had occurred in the cold of the night. But at least the surface was now relatively flat and white, and I could move on to the next phase.
Using butcher paper taped to the dock, I made up templates of the new windows that I wanted to fit. They were significantly larger than the originals, because I wanted to completely cover the areas that had been weakened by screw-holes.
Templates for the new windowsCheval de Mer waits patiently
Following local advice, I took the templates to Eagle Plastics in Hobart, who gave me a warm welcome and made me some lovely new acrylic windows, 5mm thick with a bevelled edge and a smoky tint.
Scrolling through sailing forums, it soon became clear that the only choice for adhesive was 3M Very High Bond (VHB) tape, which was readily available on the internet from Embossing and Tape Supplies (ETS). This double-sided tape is incredibly easy to use and forms a powerful bond with both the acrylic window and the painted boat.
For the first window, I did make a mistake, in that I didn’t quite butt up the black tape to completely hide the underlying white paint. I had thought that the tint and the shadow would hide the joins, but I was wrong.
3M VHB tape applied (with visible joints, sorry)You can see the joints around the edges of the window
In retrospect, I should have used a little black paint either on the window frame or around the inside edges of the window, but such is the power of VHB that you only get the one chance: Once the window was in, I wasn’t going to get it out again without a large hammer.
I did better with the rest of the windows, though. You live and learn.
Port-side forward window, without visible joints
And finally, to make the whole thing waterproof, I needed to run beading around the outside edges.
Now, according to the forums, there is one and one only solution, and that is to use Cow Dorning’s CowSil 795. In my innocence I had assumed that I would just go and buy some when I needed it, but this American product is not widely available in Tasmania, and I wasn’t going to wait to have it shipped from the US.
I contacted the local Fibreglass Shop who advised that their marine customers have always had good results with an Australian product, FixTech FS200, and moreover they had it waiting for me in stock.
I got out the 3M Scotch blue (in my opinion the only worthwhile masking tape), and carefully taped both the acrylic window and the surrounding painted woodwork.
All masked up with Scotch Blue
Like any silicone product, it was quite messy and needed care, but I found that it went on easily enough as long as I didn’t apply it too thickly. The back of a bamboo teaspoon gave a nice finish.
I removed the tape straight away, which gave me the chance to fix up any over-thick portions with my trusty wooden spoon (wetted with soapy water) before it started to cure. No matter what you do, silicone gets everywhere, but I found that dropped spots were easily removed with Goof Off, which also served to clean my spoon and fingers between applications.
It was a sunny Sunday morning with light brisk winds, a perfect day for a family sail after weeks of incessant rain. We climbed aboard, cast off, and motored out of our berth.
Immediately an alarm sounded from the panel in the cockpit. I heard it from the bow where I was keeping lookout, but I had only just replaced the depth sounder and had not calibrated it, so I assumed that it was responding to the shallow bottom under the keel. At any rate, squeezing out between rows of expensive boats on a blustery day is not the time to be focussing on electronic problems.
The alarm cut in and out as we navigated around the pontoons, and as we passed out into deep water through the arms of the breakwater I waited for the it to stop. It didn’t, and I saw Bronwyn duck forward from the helm to look more closely at the panel, and she shouted, “it says Low Press”.
Oh dear.
I stuck my head down the hatch and found that our nice clean white bilges were awash with engine oil.
Despite having lost all its oil, the one-cylinder donk was still plugging away, so we used it to get to a nearby mooring buoy. A gust caught us and we missed, and had to go round again, praying that the engine would keep on going. It did, we tied up, and killed the motor.
Now what?
We were stuck out in the Derwent River, on a mooring of unknown provenance. It looked big and well-kept, but we’d never seen anybody use it before.
We had the dinghy on board, although it temporarily lacked either a drainage bung or rowlocks. Still, it was easily enough to get the family back to the marina with diligent use of kayak paddles. We tied up the dinghy in our berth, and went home.
On Monday, we arranged for the yacht club to give us a tow to the yard, so that we could get her out of the water and have a look. It wasn’t really necessary to get her up on land, but she was overdue for an antifoul anyway, and because we bought her quickly for cash, we’d never seen her bottom, so it seemed like a reasonable opportunity to kill several birds with one stone.
That doesn’t look rightOn tow back to the marinaOut she comesNeeds a bit of work
As soon as we were up on the cradle, I pumped the oil out of the bilge and cleaned up the mess. The bilge pump – which had never worked very efficiently – was saturated in oil so I took it home for a clean. The unused piping for the water tanks (I’d removed three large tanks when we set her up for sailing rather than live-aboard) was similarly contaminated, so they went too.
The engine was pristine and clean. There was no sign of any leaks, no trails of oil, nothing. The engine sat on its blocks, and the oil sat beneath, with no indication of how it got out.
The oil filter felt rough to touch underneath, and I wondered if it had developed a pinhole. It was very, very tightly fitted, and there was evidence (in the form of crinkles on the underside) that somebody had cranked it on with a strap wrench. I had to puncture it to get it off, so destroyed any real evidence of pinhole leakage. There were also two metal oil pipes that dipped down into the bilges, where they had likely sat in rainwater for some time while the boat was unattended before we bought it, and these pipes showed a crusting of rust. I dismantled it all and ordered replacement parts.
In the meantime, I got busy with the hull. Once I’d power-washed and chipped off all the shellfish, the fibreglass was down to a previous layer of paint, and the steel keel was practically back to metal. There was a chunk missing from the rudder, where an exposed internal screw head was now visible. I applied two-pack resin where appropriate, and two-pack underwater undercoat wherever I thought I needed it.
There was a hole hereComplete undercoat for the keel
I would have preferred to rub the whole keel down and apply a smooth finish to the anti-foul, but time was short, the cradle was needed for racers rubbing down for the start of the season, and I did also have to work at my day job. A couple of top coats applied with a roller would have to suffice, on this occasion. She looked OK though.
While she was out of the water, I replaced the sacrificial anodes. The keel anodes were ready for replacement, but the one on the prop shaft was in relatively pristine condition, most likely because it hadn’t been fitted properly and only sat loosely on the shaft. To be fair, the previous owner had warned me that he had replaced it in the water and he wasn’t certain that he had tightened it enough, so I was glad to see any anode at all. I had a working theory that if the shaft anode wasn’t functioning fully, enough current might have leaked to burn a pinhole in the thinnest mild steel in the engine, which would be the oil filter.
These anodes have been working wellTightly fitted around the shaft, this time
The new set of (very expensive) oil pipes arrived from Yanmar. When the dealer got them out of the box, my first response was, “Gosh, they’re so shiny!”
He gave me a knowing look and said “Aaaah, you’ll have the old ones, then.” Some years back, Yanmar changed the design from steel to copper because of corrosion issues. Not quite a smoking gun, but a useful pointer that I might be on the right track.
Old and new pipes for a Yanmar 1GM10
I fitted the pipes, and then briefly fired up the engine. It started, didn’t knock, and the oil stayed in. I only let it run for about 15 seconds because there was no seawater coolant in the intakes. The proof would be when we put her back in the water and warmed the engine up, but at least there weren’t fountains of oil everywhere.
Pausing only to give the bilges a final clean, and then pessimistically lining them with puppy pads, we pushed her back into the sea.
Far cheaper than marine cleanersBack into the water she goes
We tied her up to the jetty, and fired up the engine. We stared fixedly at the bilges. Neither oil nor water appeared.
We waited, and listened to the rhythmic pop-pop-pop of the single cylinder. There was no oil in the bilges.
We put her into gear and strained the engine against the mooring ropes. There was no oil in the bilges.
We sat around until she was good and warm, and until the waiting rubberneckers had lost interest and got back to work, and then we quietly backed off the pontoon and opened her up. She had far more power than we were used to, and her bow pointed eagerly out into the river. She ran like silk.